As an Amazon Associate, we earn from qualifying purchases. Some links on this site are affiliate links at no extra cost to you. Our recommendations are based on thorough research and editorial judgment.

How To Clean And Dry After Saltwater
To clean and dry saltwater gear, act swiftly—time is essential! Start with a gentle rinse using fresh water, avoiding high-pressure streams. Mist your equipment and turn the reel handle to expel trapped salt. For heavy grime, soak in citric acid, using handheld scrapers for stubborn spots. Dry everything completely, as moisture invites rust. Finally, apply corrosion inhibitors for added protection. Proper maintenance now means fewer headaches later—discover more techniques to keep your gear in top shape!
Key Takeaways
- Rinse all gear immediately with fresh RO/DI water to remove salt residues and prevent corrosion.
- Use gentle rinsing techniques to avoid damaging sensitive components; mist rather than submerge equipment.
- For thorough cleaning, soak equipment in a citric acid solution for heavy grime, avoiding sensitive parts.
- Dry all equipment completely after cleaning to prevent moisture buildup, which can lead to rust.
- Apply a corrosion inhibitor after drying to protect metal components from future saltwater damage.
Immediate Rinsing of Saltwater Gear
You may be interested

When saltwater gear emerges from the ocean’s embrace, a swift response is essential—immediate rinsing is the lifeline for maintaining the integrity of fishing equipment. Saltwater damage can begin within moments, making prompt rinsing crucial. This quick action removes salt deposits that can cause rust and corrosion on metal components.
Rinsing Techniques
- Gentle Fresh Water Rinse: Avoid high-pressure sprays that could force sand deeper into crevices.
- Mist, Don’t Soak: Flow fresh water over the gear strategically, rather than submerging it.
- Turn the Reel Handle: This helps flush out trapped salt from internal parts, preserving smooth drag operation. Additionally, proper maintenance, including regular cleaning after use, is vital to ensure longevity and performance, especially for RC fishing bait boats.
Effective Use of Mild Detergents

Effective use of mild detergents acts as a safeguard against the relentless aftermath of saltwater exposure. These gentle cleansers offer several benefits, particularly for those with sensitive skin, as they are typically hypoallergenic and designed not to irritate. When cleaning saltwater gear, mild detergents help dissolve pesky salt crystals, preventing fabric stiffening—a common woe for beachgoers.
- Key Points:
- Balanced pH: Protects fabric integrity while efficiently removing dirt.
- Low Residue: Minimizes buildup that can irritate skin.
- Fabric Safety: Safe for cotton, wool, and blends.
Using cold to warm water enhances effectiveness, guaranteeing thorough results without stressing fabrics. For heavily soiled items, extended soaking may be wise—keeping harsh chemicals at bay guarantees longevity and color retention. Additionally, ensuring that gear is properly water-resistant can help maintain its quality during saltwater exposure.
Treating Fabrics Exposed to Saltwater

Saltwater can wreak havoc on fabrics, turning a day of fun in the sun into a laundry nightmare if not treated properly. To save your textiles, immediate rinsing with fresh, cold water is essential. This action removes surface salt crystals and helps prevent salt crystallization.
Rinsing Techniques:
- Soaking: Allow fabrics to soak for 10-20 minutes to dissolve embedded salt.
- Multiple rinses: Especially important for thick or densely woven fabrics.
- Mechanical Agitation: Gentle hand washing or using a delicate cycle works wonders.
To maintain fabric durability, gently squeeze out excess water without wringing. Air dry in the shade—your fabrics will thank you by remaining vibrant and strong, avoiding a harsh fate under the sun’s rays! Additionally, using a waterproof design on textiles can enhance protection against salt damage and prolong their lifespan.
Understanding Saltwater Residue Composition

The mystical world of saltwater residue reveals a complex tapestry of elements and interactions, shaping both environmental impacts and practical concerns. At its core, this residue primarily consists of sodium chloride (NaCl), forming the bulk of dried deposits. However, accompanying it are minor but essential components like calcium carbonate (CaCO3) and trace elements, detected through residue analysis.
Key aspects include:
- Total Dissolved Solids (TDS) can range from a mere 4 parts per million to over 100,000 ppm.
- Elemental Variety: Common culprits include magnesium, potassium, and sulfur, vital for geochemical insights. Understanding this composition is crucial for maintaining the waterproof designs of saltwater RC boats and preventing damage.
Understanding this chemical composition not only aids in identifying source water but also hints at environmental risks, such as corrosion—a reminder that even nature’s wonders can have a bite!
Techniques for Washing Harvested Sea Salt

Four sequential washings follow, progressively targeting specific ions like calcium, magnesium, and sulfate. This thorough approach is designed to reduce insoluble materials from 3.1% to below 0.4%, achieving over 95% sodium chloride purity. Using clear bittern, a magnesium-rich brine, guarantees effective impurity removal without sacrificing too much salt. Each washing phase is paired with mechanical dehydration, utilizing advanced equipment like sieve-bend screens to keep moisture in check. Such innovative techniques in salt washing make harvested sea salt not just cleaner, but ready for culinary and industrial uses! Furthermore, ensuring the salt is free of marine contaminants is crucial for maintaining high quality.
Importance of Centrifugal Separation
While traditional methods of separating salt from brine have their merits, embracing centrifugal separation opens new avenues for high-purity salt processing. This method boasts an impressive centrifugal efficiency of up to 99%, revolutionizing solid-liquid separation.
Key Benefits:
- Rapid Operation: Centrifugal force allows for quick separation, eliminating the need for porous filters.
- Versatile Applications: Ideal for various industries, including salt harvesting and wastewater treatment.
- Low Maintenance: Designed with corrosion-resistant materials, ensuring durability in harsh environments.
- Safety Precautions: Implementing safety features in the separation process enhances operational reliability and minimizes risks.
Fluidized Bed Drying Explained
Fluidized bed drying represents a significant advancement in moisture removal technology, effectively marrying efficiency with innovation. This process utilizes hot air forced through a perforated plate to suspend particles in a “fluidized” state, dramatically enhancing surface area contact.
Key Features of Fluidized Drying:
- Dynamic Drying: Initially static, the solid bed transforms; air pressure lifts particles, accelerating moisture evaporation.
- Regime Shifts: As air velocity increases, it changes from a fixed bed to a fully fluidized state, maximizing efficiency.
- Speed: Drying times can be reduced to mere seconds for individual particles, offering quicker results than traditional methods.
With precise airflow control and integrated cooling, fluidized bed drying not only guarantees solid moisture removal but also preserves product integrity—making it a cornerstone of modern drying technology.
Managing Moisture Content After Exposure
Managing moisture content after exposure to saltwater is essential for preserving the integrity of various materials. Saltwater can infiltrate porous substances, leading to detrimental moisture retention. Here’s how to tackle this challenge effectively:
- Rinsing: Immediately rinse affected items with fresh water. This dilutes salt deposits that cause moisture absorption, reducing corrosion risks.
- Moisture Measurement: Monitor weight change in soaked materials for accurate moisture tracking. This helps gauge when to stop drying.
- Effective Drying: Employ techniques like air drying or using desiccants. Controlled environments can further enhance evaporation, increasing absorption rates.
Failure to manage moisture can lead to continued degradation, with salt crystals forming and compromising material integrity. Proactive measures guarantee lasting durability, saving both materials and money in the long run.
Pros and Cons of Bleach Curing
Exploring the pros and cons of bleach curing reveals a method that can transform your reef rocks from neglected obstacles into pristine foundations for your aquatic wonderland. This technique boasts rapid speed, completing the process in just 7 days, considerably quicker than natural curing. The bleach’s effectiveness guarantees the removal of undesired organisms and detritus, promoting microbiological control.
However, caution is crucial. Overuse can damage the rock’s structure, while thorough rinsing is necessary to eliminate bleach residues. The method doesn’t support beneficial bacterial growth, necessitating a subsequent cycling phase. For shark-tank enthusiasts, it’s a double-edged sword—a streamlined aesthetic upgrade at the risk of careful handling and additional cycling work. Using unscented bleach diluted properly makes all the difference!
Steps for Natural Curing of Rock
Natural curing of rock can be an engaging journey for aquarium enthusiasts, as it transforms lifeless stone into a thriving ecosystem ready for the underwater world. The rock preparation involves cleaning the rocks meticulously—removing soft algae and foul-smelling materials with a hard bristle brush. Rinsing thoroughly with clean saltwater is essential to eliminate detritus, ensuring beneficial bacteria thrive.
Aiming for a curing duration of 4 to 12 weeks, place the rocks in a suitable container filled with aged RO/DI saltwater, which should cover the rock fully. Maintaining stable temperature conditions around 80°F (27°C) promotes ideal bacterial life while preventing nutrient spikes. Monitoring ammonia and nitrite levels regularly marks the path to successful curing, welcoming vibrant marine life into the aquarium.
Powerhead Utilization During Curing
Powerheads offer a dynamic solution to the challenges of curing rock in an aquarium, acting like vigilant sentinels overseeing the water’s flow.
- Powerhead Placement is critical; positioning them to direct currents over rock surfaces prevents stagnant zones where detritus can accumulate.
- The flow rate should be optimized to keep waste suspended without disturbing substrate or rock.
Multiple powerheads may be used in larger tanks for consistent coverage, aping the natural currents found in vibrant reefs. This high flow enhances microbial activity—oxygenating water and preventing the buildup of toxic gases like hydrogen sulfide. Regular inspection of flow patterns guarantees efficient cleaning, making a powerhead not just a tool, but an essential ally in achieving a crystal-clear aquarium ecosystem that sparkles with life.
Best Practices for Equipment Cleaning
With the water flow stabilized and detritus kept at bay, attention shifts toward the imperative process of equipment cleaning. Employing effective cleaning techniques guarantees longevity and peak performance.
- Rinse Immediately: Using fresh RO/DI water, rinse equipment to eliminate salt residues.
- Soaking Solutions: For heavy grime, soak pumps and algae scrapers in citric acid (4 tablespoons per quart) for 2 to 24 hours—be cautious of sensitive parts.
For stubborn deposits, a mix of hand-held scrapers and magnetic algae tools can work wonders. Incorporate maintenance tips like frequent wiping of external surfaces to prevent build-up and remember to label parts during disassembly for faster reassembly. Clean meticulously, air dry completely, and protect your investment for future aquatic adventures!
Applying Corrosion Inhibitors
Corrosion inhibitors play a vital role in safeguarding marine equipment and vessels from the relentless assault of saltwater. With various corrosion types threatening metal integrity, it is essential to choose the right inhibitor. Options include:
- Water-based inhibitors like Rust-Oleum, which are eco-friendly but suited for indoor use.
- Solvent-based inhibitors such as WD-40, ideal for outdoor marine conditions due to their strong penetration abilities.
Application methods vary; sprays and gels can easily coat ferrous and non-ferrous metals. Attention to inhibitor compatibility with different coatings and substrates is imperative—calcium-based additives can sometimes clash with resin systems. For lasting protection, select stable inhibitors resistant to washing away, ensuring your equipment can weather the storm!
Ideal Storage Conditions for Saltwater Gear
After ensuring that equipment is protected with the right corrosion inhibitors, attention must shift to the conditions in which saltwater gear is stored. Ideal storage environments preserve the integrity of rods, reels, and tackle. Key conditions include:
- Humidity Control: Maintain levels between 30-50% to avoid mildew.
- Temperature Regulation: Steer clear of extreme heat or cold—think of your gear like a delicate dessert in your kitchen.
- Ventilation: Good airflow prevents condensation and odor—nobody likes musty gear!
- Gear Organization: Use wall-mounted racks or vertical holders to keep rods straight and avoid tangles.
Elevate storage off concrete to dodge moisture. Finally, a dedicated space for your gear reduces damage risk—much like a tidy workspace boosts creativity.
Recommended Products

Key Features for Fits Most Rods or Combos - The PLUSINNO fishing rod holder can store fishing rods or combos of diameter 0.12"-0.75" (3-19mm), which can maximize the needs of fishing enthusiasts to store different types of rods. Most other brands are only applicable for rods diameter 0.28''-0.47'' (7-12mm). PLUSINNO Fishing Rod Storage Rack will organize most of your fishing gear in minimum space and nice to satisfy your needs of storage and display in daily life.

KEY FEATURES FOR FITS MOST RODS OR COMBOS - The PLUSINNO fishing rod holder can store fishing rods or combos of diameter 0.12"-0.75" (3-19mm), which can maximize the needs of fishing enthusiasts to store different types of rods. Most other brands are only applicable for rods diameter 0.28''-0.47'' (7-12mm). PLUSINNO fishing rod storage holder will organize most of your fishing gear in minimum space and nice to satisfy your needs of storage and display in daily life

【2 Sets Store 12 Rods or Combos】Ghosthorn Rod Rack can hold up to 12 rods or combos and can stores more in the same space than other brands, maximizing the use of your space and making storage tidy. It can be installed on the wall or ceiling and can be freely combined according to your needs.
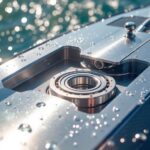
Troubleshooting Stubborn Salt Deposits
Troubleshooting stubborn salt deposits can feel like battling a relentless foe when maintaining saltwater gear. For those pesky residues, effective solutions lie in both chemical treatments and mechanical methods.
Chemical Treatments:
- Specialized products like Star Brite Salt Off work wonders, dissolving salt within minutes.
- Vinegar, either straight or mixed with water, is a household hero that can tackle stubborn stains—especially when left to sit before scrubbing.
Mechanical Methods:
- Gently tapping with a hammer or using pumice stones can dislodge hardened deposits without damage.
- A soft-bristle brush paired with a solvent is invaluable for thick layers.
After applying both techniques, don’t forget to rinse thoroughly with fresh water—like a final water ballet, flushing away the remnants of that relentless foe!
Recommended Products

ULTIMATE SALT ELIMINATION: STAR BRITE Salt Off Concentrate effectively removes salt deposits from all surfaces, including fiberglass, vinyl, painted surfaces, metal, chrome magnesium, plastic, wood, glass, and rubber

VERSATILE CLEANING AND FLUSHING: This hose-end sprayer works both as a soap dispenser for boat and car wash or as an engine flushing solution to remove salt and other deposits. Compatible with any standard hose, it makes cleaning and flushing simple.

VERSATILE USE: Ideal for flushing outboard motors, rods and reels, lures, and any metal equipment exposed to salt water. Also works great for removing road salt in winter conditions
Frequently Asked Questions
How Can I Tell if My Gear Needs Cleaning After Saltwater Use?
Approximately 60% of anglers reportedly neglect gear maintenance after saltwater use. Signs like salt deposits, decreased reel smoothness, or corrosion indicate cleaning is necessary, ideally after every outing to guarantee maximum performance and extend equipment longevity.
What Are the Signs of Salt Corrosion on Metal Equipment?
Signs of salt corrosion on metal equipment include rust spots, flaky surfaces, pitting, and rough textures. Corrosion symptoms worsen without prevention methods such as protective coatings, regular maintenance, and timely repairs to mitigate damage.
Can I Use Hot Water to Rinse Saltwater Gear?
Hot water’s helpfulness hovers on a hazy horizon; while it effectively rinses salt, its potential to strip lubricants raises risk. Rinsing techniques should emphasize warm water for ideal effectiveness without compromising gear longevity and functionality.
How Often Should I Inspect My Saltwater Equipment?
Inspection frequency for saltwater equipment should be daily, emphasizing preventative maintenance. Early detection of issues enhances tank stability and prevents costly repairs or aquatic life loss, making consistent inspections essential for overall system health.
What Household Items Can I Use to Clean Salt Deposits?
Household items like a vinegar solution and baking soda effectively clean salt deposits. The vinegar solution dissolves salt, while baking soda acts as a gentle abrasive, enhancing the cleaning process on various surfaces without causing damage.


